


7 Days 6 Nights Lemosho Route From Moshi
The Lemosho Glades route via the Western Breach is among the least used combination of routes on Kilimanjaro. The trail leads up to the western edge of the Shira Plateau, and the hike across the plateau is said to be one of the most stunningly beautiful hikes in Africa. With 6 nights on the mountain, your chances of reaching the “Roof of Africa” are very good.
LEMOSHO TREK ITINERARY
01
Nairobi – Moshi
Leave Nairobi at 7:30 am by your transport and drive to Moshi arriving in the evening. Dinner/overnight at the Zebra hotel.
02
Lemosho Trailhead (2360m) to Forest Camp (2700m)
Hiking time: 3 – 4 hours
Distance: About 5 km
Habitat: Montane forest
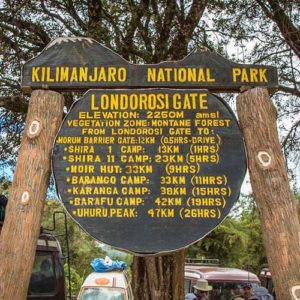
Depart Moshi at 8:00 am for Londorosi gate, about 4 hours, where you will complete entry formalities. Then drive to the Lemosho trailhead (another hour to reach the trailhead). Upon arrival at trailhead, eat lunch, then commence through undisturbed forest which winds to the first camp–about 3-4 hours of trekking. Overnight at Forest Camp (Mti Mkubwa Camp).
03
Forest Camp (2700m) to Shira 1 Camp (3840m)
Hiking time: 5-6 hours
Distance: About 7 km
Habitat: Moorland
Once out of the forest, take a steep track into a Savannah of tall grasses, heather, and volcanic rock draped with lichen beards. Ascend through the lush rolling hills below the Shira plateau, finally reaching camp at the edge of the plateau, a day of 5-6 hours trekking. The view of Kibo from across the plateau is amazing.
04
Shira 1 Camp (3840m) to Shira 2 Camp (4200m)
Elevation (ft): 12,700ft to 13,800ft
Hiking Time: 4 hours
Distance: 7 km
Habitat: Alpine Desert
Full day exploration of the Shira plateau; Trek east toward Kibo’s glacier peak, with the option to visit the ancient collapsed Shira cone, the oldest of Kilimanjaro’s three volcanoes. Arrive at Shira 2 camp (Fischers’s Camp), at 12,600 ft. Shira is one of the highest plateaus on earth. Trekking time without the optional excursion is about 3 hours.
05
Shira Camp 2 (4200m) to Lava Tower (4630m) to Barranco Camp (3860m)
Elevation (ft): 12,950ft
Distance: 9 km
Walking Time: 6-7 hours
Habitat: Alpine desert
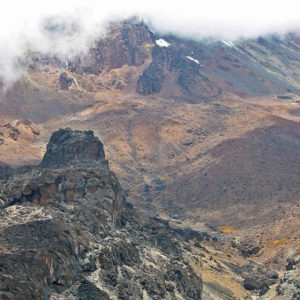
From the Shira Plateau, we continue to the east up a ridge, passing the junction towards the peak of Kibo. As we continue, our direction changes to the South East towards the Lava Tower, called the “Shark’s Tooth.” Shortly after the tower, we come to the second junction, which brings us up to the Arrow Glacier at an altitude of 4876m / 15,997 ft. We now continue down to the Barranco Hut at an altitude of 3860m / 12,664. There are many senecio and lobelia plants around the camp site which make this camp site unique.
06
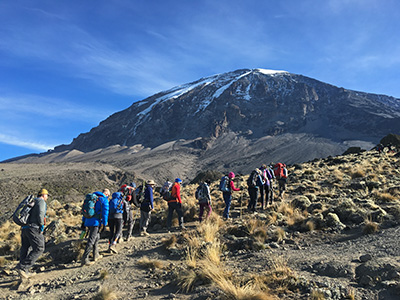
Barranco Camp (3860m) to Barafu Camp (4600m)
Elevation (ft): 12,700ft to 13,800ft
Hiking time: 4-5 hours
Distance: 10 km
Habitat: Alpine Desert
After breakfast, we leave Barranco and continue on a steep ridge passing the Barranco Wall, passing Karanga Valley campsite. From Karanga the tour heads up a moraine ridge taking your time and going slowly. The views here can be spectacular on the southern glaciers and of the glacial valleys that snake their way down the mountain. The final stage to Barafu is quite steep, and as always it’s taken very slowly. As with the day before you reach camp by around lunch time leaving lots of time to prepare and relax. In the evening your guide briefs you for the final ascent.
07
Barafu Camp (4600m) to Uhuru peak (5895m) to Mweka Camp (3100m)
Hiking time: 6-8 hours ascent / 7-8 hours descent
Distance: 7 km ascent / 23 km descent
Habitat: Stone scree and ice-capped summit
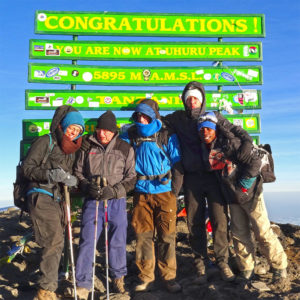
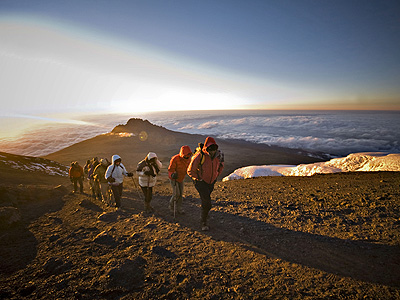
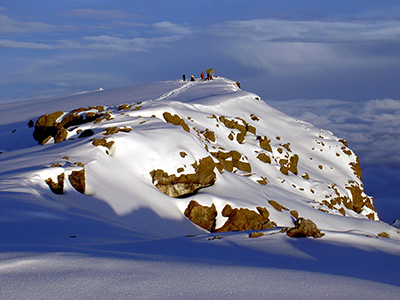
Very early in the morning (midnight to 2am), we continue our way to the summit between the Rebmann and Ratzel glaciers. You head to northwesterly direction and ascend through heavy scree towards Stella Point on the crater rim. This is the most mentally and physically challenging portion of the trek. At Stella Point (5685m / 18,652ft), you will stop for a short rest and will be rewarded with the most magnificent sunrise you are ever likely to see (weather permitting). From Stella Point, you may encounter snow all the way on your 1-hour ascent to the summit. At Uhuru Peak, you have reached the highest point on Mount Kilimanjaro and the continent of Africa.
Faster hikers will see the sunrise from the summit. It can be very cold at night at these elevations, but it will be quite warm by the end of the hiking day. You will want clothing for both extremes with you. From the summit, we now make our descent continuing straight down to the Mweka Hut camp site, stopping at Barafu for lunch. You will want gaiters and trekking poles for the loose gravel going down. Mweka Camp is situated in the upper forest and mist or rain can be expected in the late afternoon. Later in the evening we enjoy our last dinner on the mountain and a well-earned sleep.
08
Mweka Camp (3100m) to Mweka Gate to Moshi
Hiking Time: 3-4 hours
Distance: 15 km
Habitat: Forest
From the camp to the gate, you’ll have 4 to 5 hours of walking. Upon your arrival at the gate you’ll have lunch and then will be transferred to Keys Hotel in Moshi.
09
Departure
After breakfast, transfer to Nairobi or transfer to Kilimanjaro airport.
- Fitness enables fun
- Hydrate excessively
- Polé-polé (ask if you don’t know!)
- Stop & Listen
TIPS & TRICKS
After leading many successful trips into the mountains there are several “trekking-hacks” we like to tell our clients to help them better enjoy their time in the mountains.
- Ski sticks are useful when ascending the scree to the summit.
- Ski sticks also help protect your knees when traveling downhill!
- Filling your bottle at night with hot water creates a comforting heating pad to slip in your bag or beneath your pillow
- Powdered drink mix / sports mix helps with maintaining hydration (Tang, Gatorade, Lemonade)
- Find a pace to your hiking that you could keep at all day.
- Remember to pack some of your favorite snacks for a break on the trail.
More Information
Accommodations:
Accommodations on the route is in roomy two person tents. The evening stops are referred to as huts, but most of the buildings are used as shelters for the porters and for cooking. The tents are usually erected for you when you arrive, although if you want a particular position it’s worth taking charge. In the mornings it helps everyone to get away early if you lend a hand with taking the tents down.
Acclimatization:
Acclimatization is extremely important, both to let you enjoy your ascent but more importantly to avoid any serious complications. The route is planned to optimize the height gain, but you may still get a headache or feel nauseous. There are two important preventative measures: to drink copiously, even when it is really difficult, and to walk very slowly, avoiding as much as possible increased heart and breathing rates.
A drug is available, Diamox, from your doctor which is well proven to help with acclimatization. This is taken as tablets for a few days before and then during your ascent. It is safe and has no serious side effects.
It is important to remember that one possible effect of altitude is light-headedness and odd behavior, which can lead to foolish decisions. The danger here is someone who is not well insisting on continuing. Watch each other closely.
Water & Washing:
Water is available at several points and should be purified before drinking. All water in camp will be boiled and some provided for drinking the next day. A comforting tip is to fill your bottle in the evening with boiled water for the next day, and to use it as a hot water bottle overnight. Check with your guide where the water points are.
Washrooms are available at the huts but not the camps. Some camps have several and so it’s worth checking for the cleanest. If you are caught short during the walk, please find a spot as far as possible from the trail and any water. Bury your feces and paper. It is often easiest to move a large rock and use the indent as a hole. Mark your spot by balancing a couple of stones.
Trekking Fitness:
Most hiking is strenuous, but not technical climbing, and no mountain-climbing experience is necessary. But there’s no avoiding the steep ascents and high altitudes that make robust physical fitness (and a minimum age of 11 years) a prerequisite for any trip. You’ll want to consult your physician before undertaking this unforgettable adventure.
Mountain Cuisine:
The menus for all climbs are specially prepared to provide a balanced diet of fresh fruit, vegetables, plenty of protein and carbohydrates. We have tried to choose food items that are easiest to digest at high altitude.
Dinners are typically a main course with vegetable and salad. Chicken and fish are served at some of the days during the climb, with pastas and rice dishes being served in the middle of the climb while up high.
Lunches are often on the trail and usually consist of cold cuts and vegetables laid out on a table so you can make your own sandwich. Fresh hot vegetable soups are served at every meal, and packet soup is available on request between meals as is coffee and tea.
Breakfast is your choice: granola, toast, fruit, eggs, and sometimes pancakes or French toast.
Kitchen Safety:
Food and kitchen equipment will be carried by the porters and cooked by an experienced cook. It will be plentiful and wholesome but may be limited by the circumstances. Our cooks undergo extensive training and we have ongoing workshops to review menus. The cooks are particularly vigilant in their hygiene practices as contracting stomach bugs is common for visitors to the developing world.
Your own supply of chocolate and high energy snacks is a recommended.
While hiking some people have a favorite food that they like; it is a good idea to bring this from home.